The Lost Training Manual
Welcome
This training section is designed to give you an introduction into all things babblevoice. The main babblevoice Console, Vibes and Desktop interfaces can all be accessed from here.
The training is broken into the following sections:
Your Equipment
babblevoice is designed to be as simple to use a phone system as one can get. Ultimately though, you do need some equipment - you need a phone to talk on and some 'stuff' in your building:
- A broadband connection
- A router
- One or more network switches
- One or more phones
Broadband
High speed broadband connections are available in most parts of the country. In a lot of areas you can also get fibre broadband connection which boast higher speeds and a more reliable connection.
We generally see BT fibre or Virgin Media connections in our customers sites.
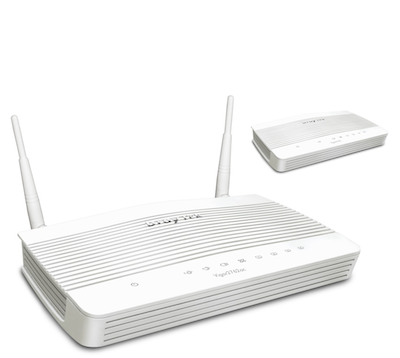
The broadband line will plug into a router - our most suitable router to install is a Draytek router.
Network Switches
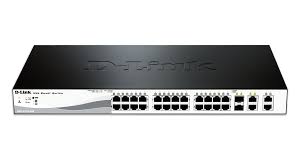
These are the things that glue all your phones together. Your phones need internet access which is provided by purchasing the broadband connection. However, most internet hubs available from the likes of Virgin media or BT only have 4 sockets in the back to plug in for different devices (or phones).
A network switch is therefore used (much like a mutliplug that you use for electric sockets) to allow you to plug multiple devices into your broadband. This can go into the 100s if required. Typically a network switch will allow 24 devices to be plugged into it - 1 socket for the broadband then 23 for the phones. We will use multiple switches if necessary.
The switches also provide power for the phones. Therefore, if you need to restart all of the phones at once it is done easily by powering the switch(es) off, then on again.
Phones
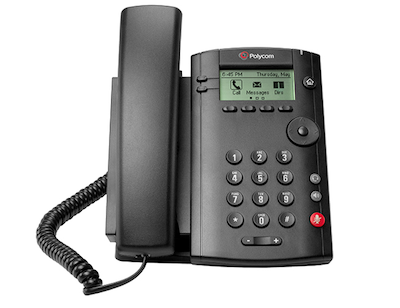
We highly recommend standard VOIP phones and the brand we like is Polycom. They have proven to be easy to set up, are reliable and the sound quality is amongst the highest we have tested. We recommend the Polycom VVX 101 but you can use Google to explore the range.
Other phones that we support can be found here.
In babblevoice we will often refer to phones as 'devices.'
The Console
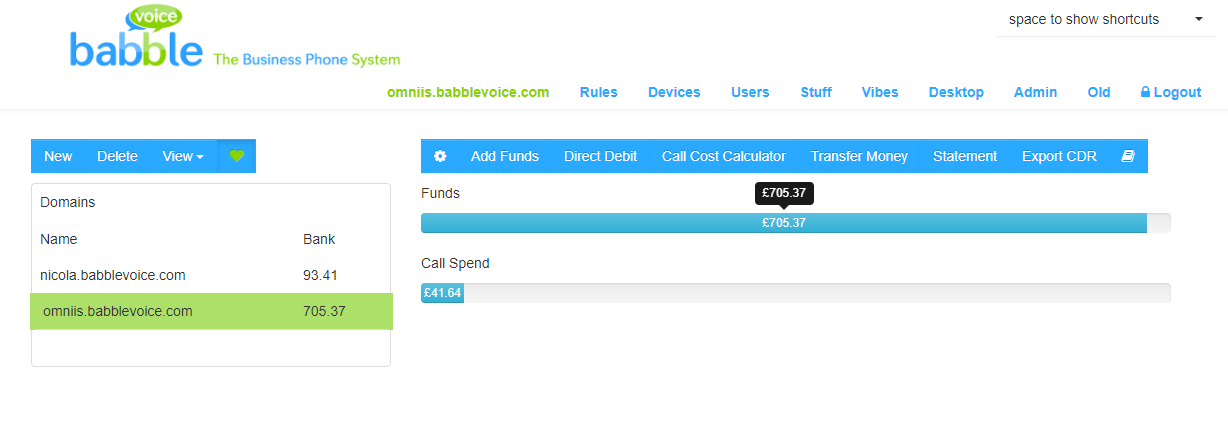
This is what a babblevoice console (this can also be referred to as a 'domain home page') looks like and is what you use to configure your phone system.
The console is accessed from the babblevoice homepage, where you click the Sign in with Google button.

All access to babblevoice is done using a Google account and therefore you will need to set up a google account or link it to an existing account. This gives great, simple security.
The console is split into different sections
The Domain
What is a domain?
Domain is simply a technical term used to logically group a bunch of stuff together. In this example, two domains are available. You may have one or more to choose from.
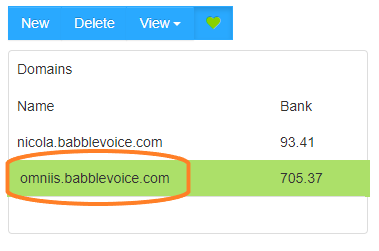
The domain highlighted green is the one that you are viewing the console for - in this instance omniis.
In babblevoice, under a domain you have a bunch of phones, call rules and users who have access to manage these items and other stuff.
Typically a domain is used to represent a business's phone system.
A business might however, decide to have several different babblevoice domains representing different parts of their business.
In surgery speak, it would probably represent a surgery and maybe a branch surgery. Some organisations group more surgeries together into one domain. The choice is yours.
More detailed information on your domain settings can be viewed here.
Money
This is where you find and access the financial aspects of babblevoice.

If you have access to more than one domain, the domain that you are viewing is highlighted in green (in the example above, the domain is omniis).
You can see at a glance the funds left on the domain and the call spend bars. These will change colour - red if you are running out of funds, through to orange and then blue if you have plenty of money.
The blue menu bar then gives you your options:
Adding funds is a simple process done by either credit card or paypal. However, we do encourage customers to set up a direct debit which will ensure you do not run out of funds - all of these are accessed on the menu bar shown above. The direct debit will automatically top up your balance each month to an agreed amount.
Please read our How to Add Funds doc for further information on this.
Call cost calculator - this button does exactly what is says! It allows you to work out the cost of a specific call.
Transfer Money - this allows you to transfer money from one domain on babblevoice to another.
Statement - this button gives you easy access to your current and past invoices.
Export CDR - this button will provide you with a list of calls that have been made to and from the babblevoice system.
Devices
Devices is just another name for phones (it can be used for other things as well, but for the purposes of this training it is just phones!).
Your devices are based on the extensions spreadsheet completed prior to install, but can be edited/added to at any time.

User Name in devices refers to the extension number which must be 4 digits long. Each extension will have a name attached which can easily be changed as new people join and others leave (click on the device you want to change, then hit the Edit button).
Each phone has a unique MAC address which identifies it to that extension, wherever it is and whatever socket it is plugged into. As long as it has internet and power it will work anywhere. Our switches provide power to the phones (POE - Power Over Ethernet) so if you wanted to use the phone at home or a different location, you would also need to get a power cable for the phone.
In this section you can manage your devices - features of the phone can be switched on or off, the phone rebooted and so on. You can also find the PIN for your device here.
Choose the device you would like to view, click on it highlighting it green and then click on edit in the blue bar at the top. This brings up the details for that particular device.
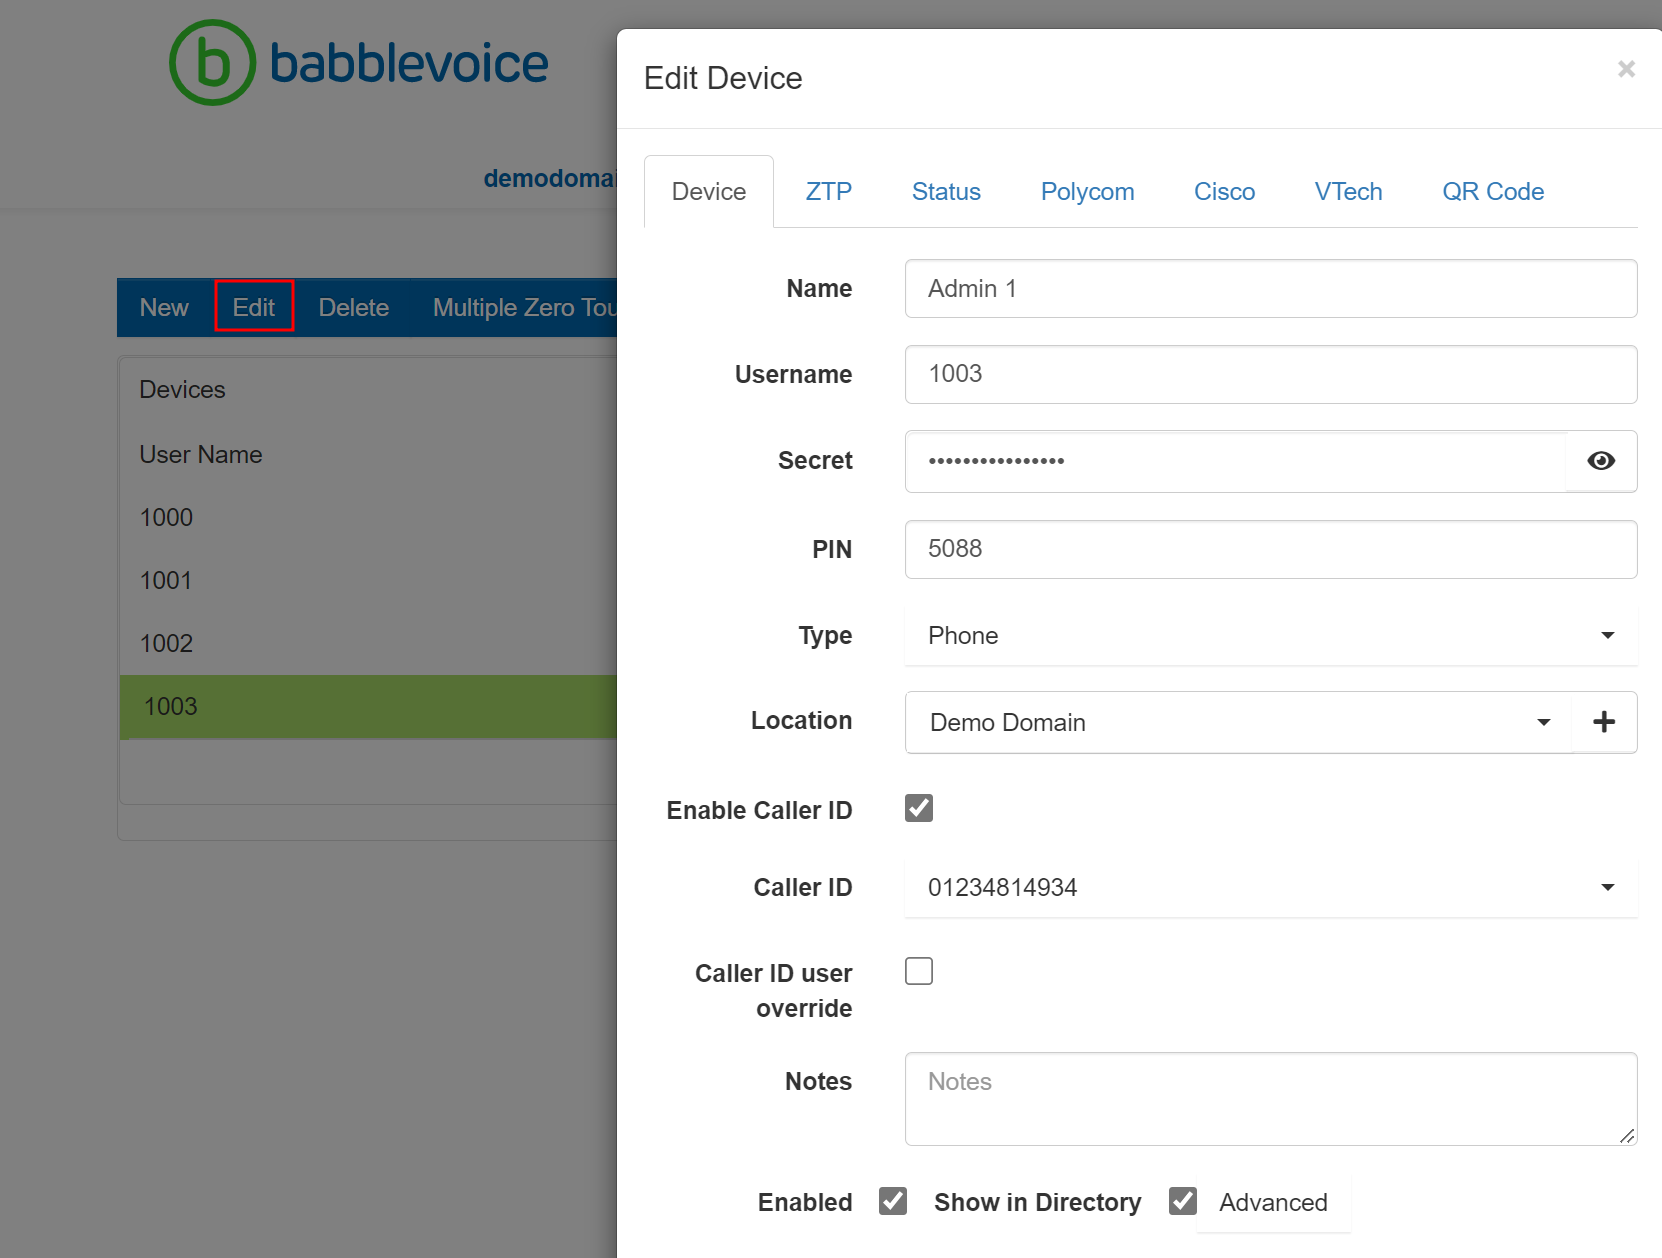
Name: the text description of that extension (i.e. Room 3, Front Desk 1). Username: the extension number itself. PIN: the PIN for the phone. Location: this is important for 999 calls Caller ID: this can be set here.
By clicking on the ZTP tab at the top of the box, you will find the MAC address of the device in question. This can also be known as the serial number and is found on a sticker on the base of the phone.
The status tab allows remote rebooting of the phone.
Please click on the links if you would like detailed information on adding a new phone or replacing a phone.
Rules
Rules are where the magic happens!

Rules allow you to direct calls depending on the time/date and user responses. Click on Rules, as shown above, to open up the Rules section.
All call rules are written in plain English, and sentences are built up from 'rule chunks' (parts of a sentence). You can delete rules, add new ones and edit existing rules from this screen.
Different rules can also be joined together by jumping from one call rule to another - you can therefore make your rules as simple or as complex as you like! As they may be complex, we sit down with you and create the rules during the installation. It is worth creating your own flow diagram to decide what should happen when people ring up i.e. what options they are given, what checks you want to do on day and time etc.
By clicking on flow you can follow the path that a particular call may take.
As the rules are such a big section we have a separate call rules guide for you to refer to for these.
Auto-attendant and IVR
You will often hear the term IVR (Interactive Voice Response) and auto attendant used interchangeably. However, they are subtly different...
- Auto-attendants provide simple menu choices to direct the user to the correct person - using a predefined route - or set of rules.
- An IVR uses some integration with a computer system.
babblevoice supports both!
Auto-attendant
An example of how the auto attendant can be used in babblevoice is shown in the rule below:
| When a call comes in on AutoAttendant then play the file intro.mp3 then wait for the user to dial 1,2,3… then jump to extension Sales,Support,OpeningHours respectively. |
In this example, once the caller has been played the intro.mp3 recording, they dial 1 for the call to jump to extension Sales, 2 for it to jump to extension Support and so on.
You can then create further rules to combine with this first one i.e.
| When a call comes in on Sales then queue the call for group SalesGroup, queue for 3600 seconds then end the call. |
Further details regarding implementing auto-attendant into your rules can be found in our call rule guide.
IVR
As we have already said, IVR is very similar to auto attendant, only that it is linked to some form of intelligence or data source - such as EMIS Web.
For example when linked with EMIS Web, when a patient calls in, their call can be linked to their patient record. For example, it can enable patients to book appointments over the phone without having to speak to your receptionists.
A pre-built IVR is available for EMIS Web - please read our docs for further information on EMIS.
There is also a simple language called BAAXML to enable programmers to integrate with their own system.
Users
Clicking on the Users button in the menu bar will enable you to view who has access to the domain. This screen will also allow you to remove users you no longer want to be able to access your domain.

Clicking on a User and then pressing the Edit button in the blue bar will allow you to see/edit their permissions (what they have access to on your babblevoice system).
It is best to have an "owner" user with full permissions and then lesser user(s) for desktop use on each PC.
If you would like further information regarding permissions please read our Users guide which is aimed at domain owners.
To access babblevoice, users will need access to a gmail account. New users can be added to your account once they have a gmail account. Detailed instructions regarding adding users to babblevoice can be viewed here.
Stuff
Stuff is the kind of a catch all for everything else. Generally it contains all of the things you pay a small monthly subscription for - such as a public phone number - or call recording space. It also houses call groups and locations.
Voice Prompts + Music on Hold - open this by highlighting it green and then clicking on Edit. This is where you find any music and/or message recordings that you have done, and uploaded to babblevoice.
Group... this is where you see the groups that are setup that your devices may be members of. By clicking on a group and then pressing Edit, you can see which devices are currently members of it. Typically, you might have a group for the reception phones and another for office admin. babblevoice will manage the queues for these groups and ensure that everyone is answered as quickly as possible and the workload is shared around fairly.
Location this is an important part of babblevoice. Each device needs a location set for it to inform 999 services in case a 999 call is made from that device. Please read our emergency calls doc for more information about this.
EMIS Web for those surgeries that are integrating with EMIS. More details can be found here.
Call Recording click on this and then press the Edit button to view. From here you can see your monthly spend on call recordings and Edit it if required.
Desktop
babblevoice Desktop is an application which runs in a browser, Google Chrome extension or on Windows. It is a helper application to the phone on your desk. Your phone will work very well on its own, but babblevoice Desktop gives you more functions than are available on your phone:
- See who is on the phone or not.
- Dial.
- Transfer a call (both blind and attended).
- Integrations (i.e. EMIS Web).
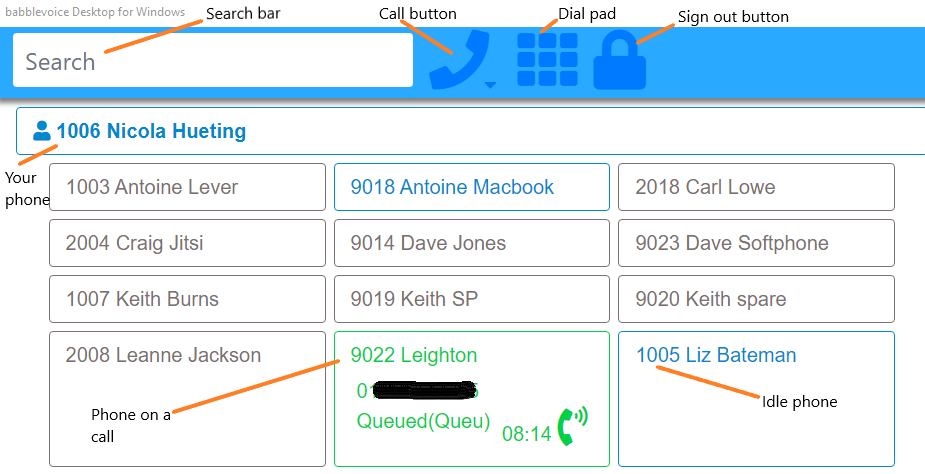
At the top of the screen there is a main control bar with a search box.
Clicking on the search box opens a drop down menu.
The cog is used to configure your desktop.
The lock is for signing out!
Phones which appear as grey are offline.
Those phones that are blue are idle.
Phones on an active call are shown in green.
A call that has been put on hold will be shown in red.
Please read through our online doc Using babblevoice Desktop for a more detailed guide.
Vibes
Vibes is babblevoice’s reporting suite - a full reporting dashboard which is designed for both a manager's personal reporting system and for a large screen format, to provide useful feedback for teams of users.
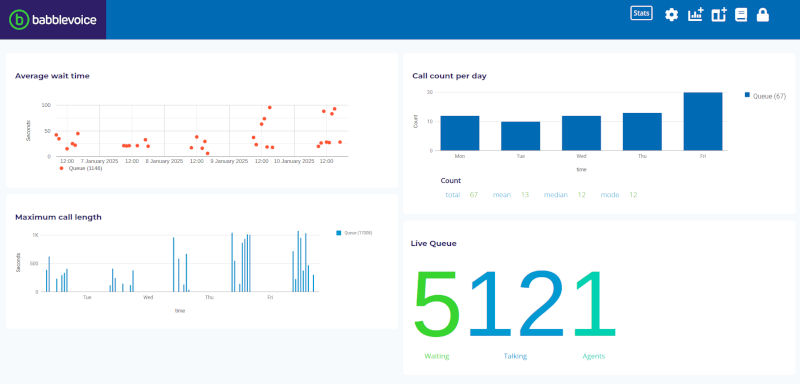
Vibes can be accessed a couple of ways:
- From your console click on the Vibes button in the menu bar.
- From www.babblevoice.com - hover over the Sign in button in the top right hand corner of the page and then click on Vibes.
A few terms explained:
| Term | Description |
|---|---|
| Vibes | Our reporting application. |
| Board | Like a whiteboard, you can place report elements onto a board to make up a report. You can have multiple boards setup. |
| Widget | A micro application which runs on a board. You can have multiple widgets per board. Each widget can be configured to display the data you want. |
| Vibe | A widget which has been placed on a board and which has then been configured to display some data. |
Our widgets currently available are:
- Call details, including accessing the call recording
- Domain balances
- Statistics
- Live queue
- Voicemail
- Switch
- Lazy agent
Guiding you through Vibes:
